How to add a new Post in WordPress?
Beginner’s Guide to Add new Post in WordPress Websites
Now that you are familiar with the using the WordPress dashboard explained in our last post, we will now move on to the next step of adding a new post.
The beginners who have just learned using WordPress dashboard may find the interface of adding a post tad confusing. But in this post WordPress savvy users may also be amazed to discover some hidden features on the “add post” screen.
We will cover almost all the features of the “add new post” page so that you can make your post attractive and useful by adding all the features.
The First screen of “Add New Post”
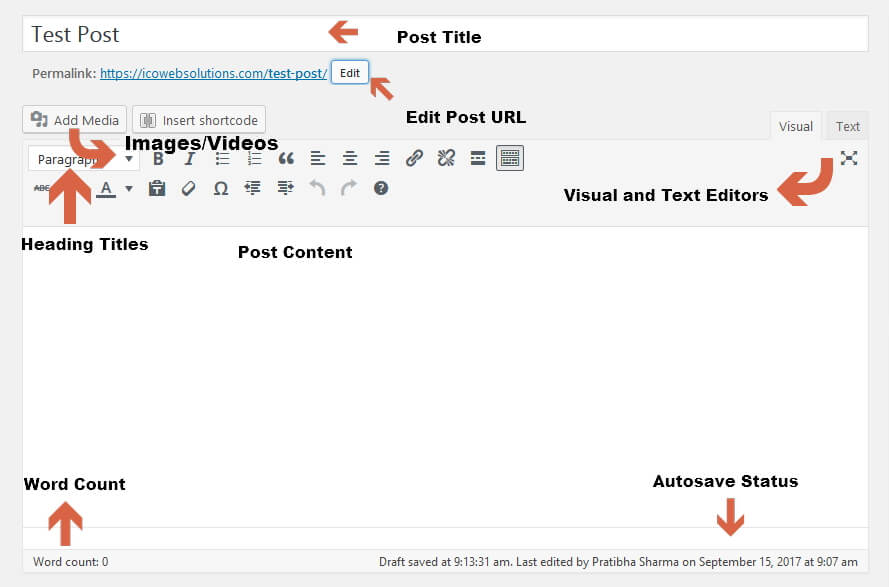
The first step before going into details is to understand the sections when you see the “add new post” screen.
Visual and Text Editors in WordPress
You can work on any of the editors; Visual or Text. However as a beginner we would recommend working on the Visual tab, rather than the Text editor.
Visual Editor is an easy to learn and user friendly text editor. It displays the formatting buttons right upfront just like a Microsoft Word Page. You must have used Microsoft word to crate word pages, right? To make the content look more clean and appealing you use the formatting options like bold, italics, underline etc.
Similarly in WordPress you can format the post content in the visual tab by using the formatting buttons.
Whereas, text editor is a plain text editor where you can see the HTML code used for formatting or write your own code. We highly recommend using this section only if you are confident about using codes. Or else you will end up messing the post’s formatting.
Post Title and Post URL
The first text area which you will see on the “add new post” screen is the “Post Title” section. Give a title to your post here.
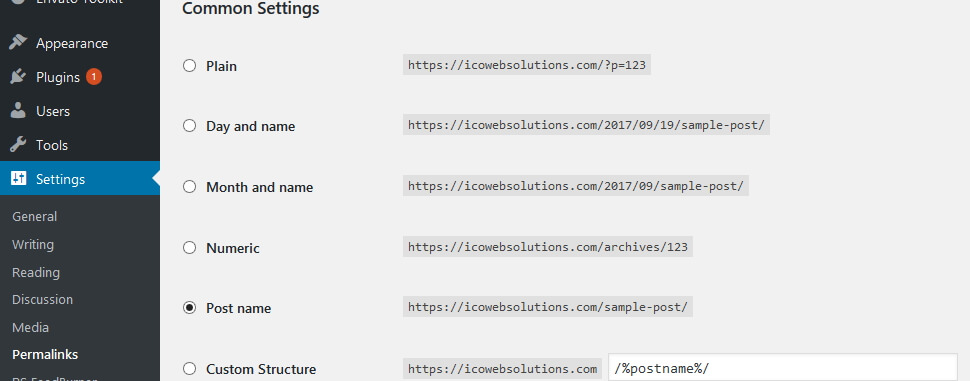
Just as you write the title, you will notice a permalink to your post just below the title. This is an auto-generated URL by WordPress based on the title of your post. For SEO purpose make sure you are selecting the SEO friendly URL structure option from the “Setting” tab on the WordPress Dashboard.
Post’s Content Area
The main body of your post goes in the “Post Content” area. While on the “visual tab”, you can format your content by using the formatting options from the toolbar. Alternately you can also use one of the many keyboard shortcuts to give speed to your writing process.
Word Count
In the footer of the post content area you will the count of words used in the post. This is useful to keep a track of minimum word count for SEO benefits.
Autosave
WordPress works in the best possible way to save your work from losing due to Internet Connection or hardware failure errors.
For this reason, WordPress saves the draft of your post automatically just as you start composing your post’s content. This autosave draft of your post is stored in your site’s WordPress database temporarily.
As you keep adding new/more content or you save your draft, WordPress updates the autosave temporary draft with the new one. The status of your current draft and autosave can be found in the footer of the Content area next to “word count”.
Adding Images and Media in WordPress
In the “add new post” page, between the title and the post content you will see the “Add Media” button.
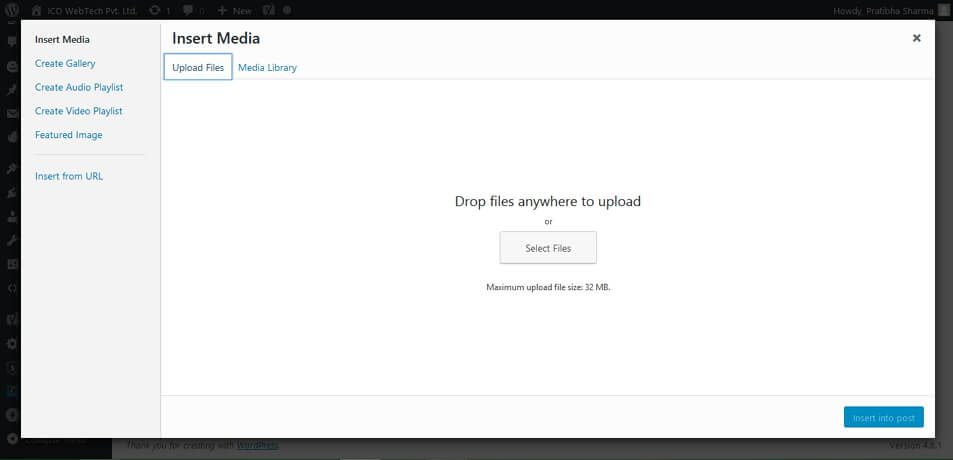
Just click on this button and in a popup window you will see the two option; “Upload files” and “Media Library”. Select the upload files option and add the image from your local machine to your WordPress blog.
You can also perform other media related tasks here. To be more precise, you can create image galleries, audio playlists, video playlists, featured image and also image from a specific URL.
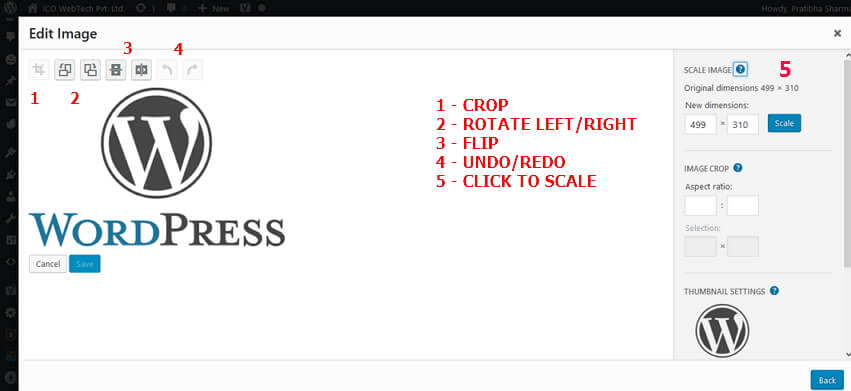
Once uploaded WordPress also gives you the option of editing the image with some basic image editing tools.
Publishing Options in WordPress
The “add new post” screen in WordPress is separated by two columns. On the left column you will see the Post title and content area. Whereas on the right side you will see various Meta boxes to organize post settings.
In the top most box you will see a label “Publish”. This is the section where you can find all the options related to publishing your post.
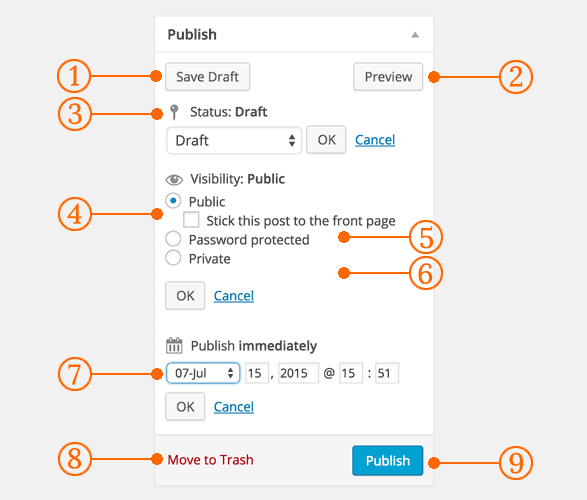
- Save Draft – save the draft of your post or page while still working on it. However WordPress keeps auto-saving your posts temporarily as you write them to keep you from losing your work.
- Preview – at any time you can see a live preview how your post will look after publishing.
- Status – WordPress automatically sets a status for your post depending on whether it’s a draft or a published post. If you select Pending Review it would mean that your post draft is waiting to be reviewed by an editor before publication.
- Visibility – expand the section by clicking on the edit link next to it. It will expand to give you the following options of public, Stick this post to the front page, Password protected and private.
- Public – choose this option if you want your post to be available for all the users.
- Stick this post to the front page – by choosing this you can display this particular post on top of all other posts
- Password Protected – if you want only selected users to access the post you publish, then you can protect your post by adding a password to it. This will ensure the access to the post only when a user enters the correct password.
- Private – if you choose this option then your post will be visible to only those users who have the admin rights to your WordPress website.
- Publish immediately – expand this by clicking on the Edit button to see the time and date options. You can use this option to schedule future posts or create back dated post.
- Move to trash – if for any reason you do not want the draft or published post, then you can delete it by clicking on this radio button. Deleted posts can be restored from the trash for up to 30 days.
- Publish – just click this button to publish your post.
Adding Categories and Tags in WordPress Posts
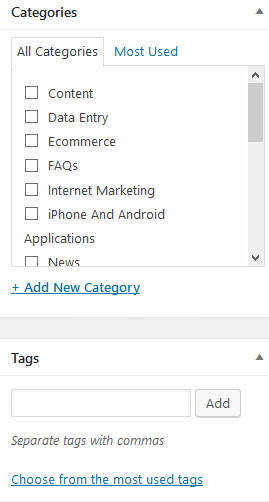
You will find the categories and tags boxes in the right hand column, below the publish box. Assign categories and tags to your posts from here. This will deliver the posts in a more meaningful format and will also boost your site’s SEO.
You can also speed up adding tags by choosing from the most recently used tags option.
Adding Featured Image or Post Thumbnails in WordPress “Add a new post” Page
Just below the “Tags” on the right hand side you will the Featured Image box. Mostly all the WordPress themes support featured images or post thumbnails for posts.
To add the featured image in the post just click on “set featured image” link, and a media uploader pop-up will appear in front of you. You can either choose from the “Media Gallery” or upload a new image from your local machine.
Screen Options
WordPress hides some of the screen visibility options by default which are not very common to use to give a cleaner and simple user experience. But you can edit these options depending on your requirement and usage.
To edit the options just click on the “Screen Options” button on the top right corner of the page and expand it.
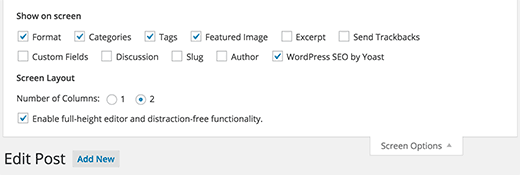
Some of the options will already be checked. These already checked options are the best for a beginner. But as you get comfortable with WordPress you can explore other options too.
Some of the useful options are:
- Excerpts
- Send Trackbacks
- Custom Fields
- Discussion
- Slug
- Author
- WordPress Plugins Options
Adding Excerpts in WordPress’s add a new post
Just below the content editor and the Plugin used (if any) you will the “Excerpts” box, after you enable it. By using excerpts box you can add a short summary about your post.
I’d recommend of adding a brief summary on the static page and then the complete post on the individual blog post page.
Send Trackbacks
By using this option you can notify other blog owners that you have linked to their content. However, if the other blog owner is also using WordPress, then you need not send them trackbacks. Because your WordPress site will on its own ping them when you publish the post.
Some spammers misuse this feature which is why most of the site owners disable them in the screen options.
Custom Fields in a WordPress Post
This option should be used when you are very comfortable using the WordPress website. Or else you will end up messing the visibility of the post.
The custom fields enable you to manually input custom information in your posts.
Discussion
A great way to engage your audience is to enable discussions, or in WordPress language, enable comments.
But unfortunately just as your website start getting popular you will start receiving spam comments. If you are not sure how to combat spam commenting, then disable the comments and pingbacks for your posts.
Slug
The user friendly and URL valid name of a post is a Slug.
http://example.com/2017/09/test-post-slug
The most important use of a slug is to create the permalink of the post.
Although WordPress generates a post slug automatically, which you can see as the post URL below the post title. But you can also edit it to give a different URL name to the post.
Author
WordPress assigns an author to the post by default. However if you want to show another user as an author to the WordPress post, you can do that by selecting it from the Author dropdown.
WordPress Plugins
If you are using any plugin for SEO it will also appear, if enabled, right below the post content area. You can change the settings to it right from the “add a new post” page.
Contact Our South Delhi, India WordPress Website Design Company
If you need more help regarding the beginner’s guide for WordPress, then feel free to contact our team of best WordPress designers and we will respond within or in less than 24 hours.
