Beginners Guide to Use WordPress Visual Editor
Now that you have learned how to add a new post in WordPress in our last post. So, let me share the most effective and easy to use tips and tricks of mastering the use of WordPress Visual Editor.
As per a very interesting blog on Hubspot, organizing your content is very important feature of publishing a blog.
I definitely agree with it.
Because no matter how useful information is there in the content, but the way it is presented is very important.
The text should be:
- folded neatly,
- it should be organized,
- information should be segregated
- suitable formatting options should be used, and
- proper heading, sub-headings should be used.
The WordPress visual editor functions in a WYSIWYG (What you see is what you get) environment to create content. For this reason, most WordPress users spend more time experimenting with the visual editor trying to use the best formatting option for their post.
Although it’s great to experiment with functions, but;
Is it wise to do it at the cost of the valuable asset: TIME?
I guess your answer is same as mine, NO!
Therefore I have assorted the 10 most useful tips and tricks to excel the use of WordPress Visual Editor.
WordPress Visual Editor

WordPress Visual Editor is a custom modified version of TinyMCE, which is an open source software using advanced WYSWIYG HTML editor.
The WordPress visual editor gives you an option to add more formatting options and button to it. Don’t worry, you’ll be able to use it using the below tips.
Tip 1 – Use the Kitchen Sink Button
Just as you log in to the WordPress dashboard and visit the “Add New Post” page, the visual editor you see will have only one row. To reach to the second row with more options, click the “kitchen sink” button (shown in the above image) which will be on the right side of the visual editor. It is usually the last button.
Tip 2 – Change the font size in WordPress Visual Editor

When you write a blog post, write it with an aim of making it readable, understandable, and attractive when displayed to the users. This has great benefit in comparison to a blog post written without any headings and fonts.
Apart from the visual advantage, the font size option in WordPress Visual Editor also gives you the option to choose from different Headings. You can choose from various heading options ranging from H1, H2, H3 and so on. These heading not only highlight the titles but is also important from SEO prospective.
Tip 3 – Paste as Plain text in WordPress Visual Editor
Sometimes you may have the requirement to paste some content from a different web page or blog or to transfer your own website’s content from old to new. In this case you should paste the content in the visual tab by selecting the “Paste as Text” option, in advance, from the editor.
Second option to remove all the formatting and just keep the text is to paste the content in the “Text” section. You can choose either of the two options to get plain text in the content area.
Tip 4 – How to add Special Characters in WordPress
Have to use copyright or registered or trademark symbol in your post?
Do not worry. WordPress Visual Editor has made it very easy for you. Just press the “Special Characters” button. Just as you press the button a pop-up containing various special characters will appear before you.
Simply click on the special character you need and you are good to go.
Tip 5 – Use of HTML/Text Editor in WordPress Visual Editor
While Visual Editor is very easy to use, has shortcuts, and helps in creating visually appealing content. Text editor and its importance cannot be ignored.
At times you may find yourself struggling with alignment issues or after trying multiple times still the formatting gets mixed up with the content and so on.
This is where the HTML or Text editor comes to use. Just click the Text tab and experience how easily such issues get resolved.
Tip 6 – Use the Keyboard Shortcuts
As per an article about keyboard vs. mouse efficiency using keyboards shortcuts is a way more efficient method rather than using mouse because:
- Keyboard Shortcuts are 30% faster
- Improves ergonomics
- Improves concentration
- And, it is fitter and healthier
I totally agree with it. Moreover, it sometimes get very annoying to break the writing flow from the keyboard and reach for the mouse or mouse board to hover over formatting options.

So, use the keyboard shortcuts from WordPress Visual Editor to save time and increase efficiency.
Tip 7 – How to add Single and Double Line Space
![]()
At times beginners find it difficult to add single or double line space between two paragraphs. It can be done very easily.
Simply press enter if you have to add a double line space. And press Shift+Enter to add single line space or to break the line.
Tip 8 – Use Distraction free mode

The one important requirement while writing is to get a distraction free writing environment. While WordPress cannot control the external environment. But it sure offers a Distraction free mode to write the post.
Just press the button shown in the image above to get the full screen writing mode and give complete attention to writing without any user interface distractions.
Tip 9 – How to add links in WordPress
Adding links is very important for SEO objectives. Adding links in WordPress is a very easy process.
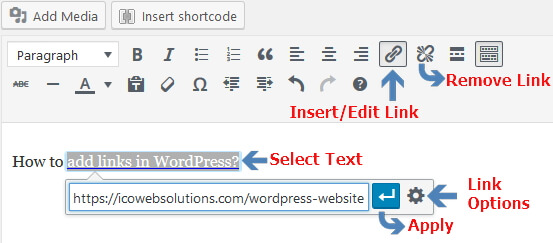
Just follow these three simple steps to add links to your post content.
- Select the text where you want to add the link.
- Now click “Insert/Edit Link” button
- Insert the link in the pop-up and press enter.
WordPress also gives you can option to open the link you just added in the same window, or in a new window. For this click the “Link settings” button, check or uncheck the option “Open in a new tab” and click update.

If for some reason you want to remove the link simply click on the “Remove link” button next to the “Insert/edit Link” button.
Tip 10 – What is indentation in WordPress Visual Editor?
What is indentation anyway?
Indentation is when you leave some space between the left margin and the start of an indented word.

In WordPress Visual tab this is again a very simple process. Simply select the word or line you wish to indent and click the “Increase Indent” button.
If you do not like the increased indent then go back to the original form by clicking “decreased indent” button just next to the increase indent button.
We hope these tips would help you to master the formatting using the WordPress visual editor.
Contact our WordPress Website Design Company in Delhi NCR, India
I have tried to cover almost all the tips which will help you to master the use of WordPress Visual Editor. Though, if you have any particular query please contact our support team here and we will respond to you with 24 hours.

Related items

Highlights WordPress 6.9.2 was released to patch ten security vulnerabilities. After the u

In today’s fast-paced digital world, your website is so much more than just an online busi

WordPress stands as one of the most versatile and powerful content management systems (CMS